A broken carbonating lever can quickly turn your sparkling water dreams into a flat reality. As an experienced soda maker technician, I’ve seen countless machines suffer from this common ailment. The good news is that many of these issues are surprisingly fixable with a bit of DIY know-how, saving you money and extending the life of your beloved appliance. This guide will walk you through understanding why these levers break, the tools you’ll need, and step-by-step instructions for popular repair methods.
|
Our Picks for the Best Soda maker in 2026
As an Amazon Associate I earn from qualifying purchases.
|
||
| Num | Product | Action |
|---|---|---|
| 1 | Ninja Thirsti Drink System, Soda Maker, Create Unique Sparkling and Still Drinks, Personalize Size and Flavor, Carbonated Water Machine, 60L CO2 Cylinder, Variety of Flavors, Color Black (model 1001) |

|
| 2 | Mysoda Ruby 2 Sparkling Water Maker - Soda Streaming Machine Silent Carbonated Water Machine Robust Long-Lasting Aluminium Soda Maker 1L Water Bottle Without CO2 Cylinder - Black Copper Soda Machine |
|
| 3 | Philips Sparkling Water Maker ADD4901BKOQ/37, Plastic Soda Streaming Machine with Quick Twist Bottle, 1L BPA free PET Carbonating Bottle, Soda Maker Compatible with 60L CO2 Carbonator (NOT Included) |
|
| 4 | SodaStream Terra Sparkling Water Maker Bundle in Black - includes 3-Pack CO2 and Carbonating Bottle |
|
| 5 | Black Stainless Steel Sparkling Water Maker Soda Machine Includes 1L Stainless Steel Black Bottle and 1 C02 Cylinder |
|
| 6 | SodaStream - Terra Sparkling Water Maker - VALUE BUNDLE - CQC CO2 system - Includes 2x CO2 Cylinders, 3x 32 Fl Oz Dishwasher Safe Bottles, 2x Bubly Flavor Drops - Combine with Pepsi Flavors - Black |
|
| 7 | SodaStream - Terra Soda Streaming Machine - STARTER KIT - Sparkling Water Maker with CO2 & Bubly Drop - Eco-Friendly, No Batteries Needed - Black |
|
| 8 | Philips Soda Streaming Machine, Stainless Sparkling Water Maker Easy Install with Quick Twist 1L PET Carbonating Bottle, Soda Maker Compatible with 60L CO2 Carbonator (NOT Included), ADD4902BKOQ/37 |
|
| 9 | Philips Sparkling Water Maker, Soda Streaming Machine with Quick Twist Bottle, 1L BPA free PET Carbonating Bottle, Soda Maker Compatible with 60L CO2 Carbonator (NOT Included), ADD4902BKOQ/37 |
|
| 10 | Soda Siphon 1L,Portable Sparkling Water Maker,Compact Carbonated Water Machine for Flavored Drinks Reusable Beverages Machine Kit,Travel Soda Machine for Home & Outdoor |
|
Understanding the Problem: Why Do Carbonating Levers Break?
The carbonating lever on your soda maker, often a button or a handle, is subject to repeated mechanical stress with every use. Over time, this constant pressure can lead to wear and tear, especially in components made of plastic. A prevalent issue across various models, particularly those from popular brands like SodaStream, involves the internal plastic pins or tabs that act as a fulcrum for the lever. These small, critical parts are often made from materials like ABS plastic, which can become brittle and snap under strain.
When these pins break, the lever loses its pivot point, resulting in a loose, unresponsive, or completely detached button. Manufacturers often do not offer replacement parts for these small, internal components, pushing consumers towards purchasing an entirely new unit. This lack of readily available spare parts makes DIY repairs or third-party solutions incredibly valuable for keeping your soda maker out of the landfill.
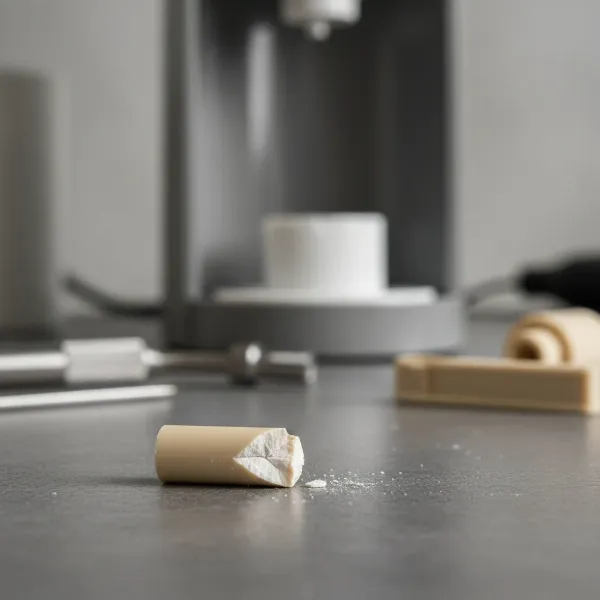 Close-up of a broken plastic pin from a soda maker's carbonating lever mechanism.
Essential Tools and Safety Precautions
Before you begin any repair, gather the necessary tools and prioritize safety. Working with electrical appliances and pressurized CO2 cylinders requires careful attention.
Commonly Needed Tools:
- Screwdrivers: A set including Philips head and flathead screwdrivers is usually sufficient. Some models might require specific square head or Pozidriv bits.
- Pliers: Needle-nose pliers or combination pliers are useful for gripping small parts, bending wire, or removing stubborn components.
- Utility Knife: Essential for cutting notches if you opt for a wire reinforcement repair.
- C-clip Removal Tool (Optional): Some older or specific models, like certain KitchenAid SodaStream units, use C-clips to secure handles. A specialized tool or two small flathead screwdrivers can help with removal.
- Adhesive (Optional): Strong plastic glue or epoxy for minor cracks or reinforcing certain connections. Hot glue can be used for temporary fixes or to secure threads.
- Small Container: To keep track of screws and tiny parts.
Safety Precautions:
- Unplug the Machine: Always disconnect your soda maker from the power outlet if it’s an electric model.
- Remove CO2 Cylinder: Before disassembling, ensure the CO2 cylinder is completely removed. This eliminates any risk associated with pressurized gas during the repair.
- Work in a Well-Lit Area: Good lighting will help you see small components and prevent errors.
- Take Photos: Document each step of the disassembly process with your phone. This will be invaluable when you reassemble the machine, especially for complex mechanisms or specific screw placements.
- Handle with Care: Plastic components can be fragile. Apply gentle, even pressure when prying or pulling parts apart to avoid further damage.
- Wear Eye Protection: Small springs or plastic shards can fly off during disassembly.
General Disassembly Steps for Your Soda Maker
Disassembly procedures can vary significantly between different soda maker models. However, the general principle involves carefully opening the outer casing to access the internal mechanism.
- Remove External Components: Start by removing the CO2 cylinder and any water bottles or drip trays.
- Locate Screws: Most soda makers have screws hidden on the back panel, bottom, or under rubber feet. Use the appropriate screwdriver to remove them. For some models, you might need to pry off decorative panels or covers to reveal additional screws.
- Open the Casing: Gently separate the housing panels. They might be held together by clips in addition to screws. A flathead screwdriver can be used to carefully pry open seams, but avoid excessive force to prevent cosmetic damage.
- Tip for SodaStream Genesis models: Some older Genesis models might require pushing down on the side panels with a flathead screwdriver and pulling up gently to release clips before you can access internal screws.
- Tip for KitchenAid models: You might need to remove screws from the rear of the head, a band, and potentially C-clips from the handle shaft to free it. Taking photos is particularly helpful here.
- Identify the Carbonating Lever Mechanism: Once the casing is open, locate the carbonating lever assembly. You’ll typically see the lever, a plunger that interacts with the CO2 valve, and often a spring mechanism. Inspect the area where the lever connects to the plunger for signs of breakage, typically a snapped plastic pin or a cracked pivot point.
DIY Repair Methods for a Broken Carbonating Lever
Here are some effective DIY methods to repair a broken carbonating lever, ranging from simple fixes to more robust solutions.
Method 1: The Wire Reinforcement Fix (for broken plastic pins)
This method is ideal when the original plastic pin or tab that serves as the lever’s pivot point has snapped off. It uses a strong wire to create a new, more durable fulcrum.
- Inspect the Broken Part: Carefully examine the broken lever piece. Often, the pin will have a hollow center or a channel where it broke.
- Prepare the Lever: If the broken pin leaves a hollow space, you can thread a piece of sturdy wire (e.g., 17-gauge wire or a straightened jumbo paperclip) through it. If there’s no suitable hole, you might need to create small notches on the lever’s body using a utility knife. Cut these notches on three sides around where the pin broke, creating channels for the wire to sit securely. Be cautious not to cut too deep, as this can weaken the plastic further.
- Thread and Secure the Wire:
- For hollow pins: Thread the wire through the hollow pin.
- For notched levers: Wrap the wire around the notched area, ensuring it sits firmly in the channels you created.
- Create the Fulcrum: Position the wire to create a new pivot point that will interact with the internal mechanism. The wire should extend slightly beyond the original pin’s position.
- Reinstall the Spring: Ensure any small springs are correctly placed back into their designated spots, as they are crucial for the lever’s return action and proper function. The wire will act as the new fulcrum for the lever’s movement.
- Tie and Trim: Securely twist or tie off the ends of the wire. Use pliers to ensure it’s tight and trim any excess wire to prevent it from interfering with other components or the casing.
This method effectively bypasses the weak plastic point by replacing it with a more resilient metal connection, often resulting in a stronger, longer-lasting repair.
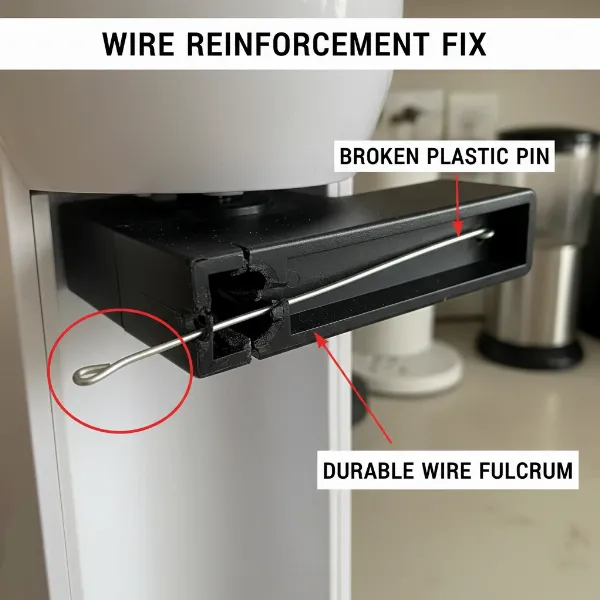 Diagram or photo showing a wire reinforcement fix on a soda maker's carbonating lever.
Method 2: 3D Printed Replacement Parts
Many soda maker models share similar design flaws, leading to a demand for custom, more durable replacement parts. The 3D printing community has stepped up to offer enhanced carbonating levers or reinforcement pieces.
- Source the Part: Look for “SodaStream repair part,” “carbonating lever replacement,” or “3D printed SodaStream fix” on platforms like Etsy or dedicated 3D printing forums. Ensure the part is compatible with your specific soda maker model. These parts are often designed with reinforced stress points, making them more robust than the original.
- Remove the Broken Lever: Follow the general disassembly steps to access the internal mechanism and carefully remove the broken lever assembly. Pay close attention to any springs or small washers that might come loose.
- Install the 3D Printed Part:
- Place the spring(s) back into their correct positions on the new 3D printed lever.
- Carefully align the new lever with its pivot points and attach it. The 3D printed part will often come with new plastic pins or a design that integrates directly into the existing mechanism.
- Ensure the lever moves freely and correctly engages the plunger that activates the CO2 valve.
- Test Movement: Before closing the casing, gently operate the lever to ensure it has the correct range of motion and springs back into place.
“Many common soda maker issues stem from small, easily replaceable plastic parts that fail under routine stress. With the rise of 3D printing, consumers now have access to more durable, custom-designed solutions that can significantly extend a machine’s lifespan and combat planned obsolescence.” – Admin, Sodamakerpro.com
Method 3: Simple Adhesive Fixes (for minor cracks or loosening)
This method is suitable for minor cracks, loose connections, or when threads have stripped, but the main structural integrity of the lever is still intact.
- Assess the Damage: This fix is best for hairline cracks in the lever’s plastic, a loose connection point that hasn’t fully snapped, or stripped threads on a small insert that connects to the lever.
- Clean the Area: Ensure the repair area is clean, dry, and free of grease.
- Apply Adhesive:
- For cracks/loose connections: Apply a strong plastic-compatible glue or epoxy to the cracked area or the loose connection point. Clamp the pieces together if possible until the adhesive cures.
- For stripped threads: As noted by some DIYers, filling stripped threads with hot glue and then re-screwing the component can provide a temporary or even semi-permanent fix by creating new gripping surfaces. This is often applied to small inserts within the lever mechanism.
- Allow to Cure: Let the adhesive dry completely according to the manufacturer’s instructions before reassembling or testing the unit.
Reassembly and Testing Your Repaired Soda Maker
Once your repair is complete, it’s time to put everything back together and ensure it works correctly.
- Reverse Disassembly: Carefully follow your photographic documentation (if you took pictures) to reassemble the internal components and close the casing. Ensure all wires, springs, and small parts are correctly seated.
- Tighten Screws: Secure all screws firmly, but avoid overtightening, which can strip plastic threads.
- Reinstall CO2 Cylinder: Once the machine is fully reassembled, reinsert the CO2 cylinder according to your soda maker’s instructions.
- Test for Leaks: Before carbonating, visually inspect for any gaps or misaligned panels.
- Test Carbonation: Fill your bottle with water, attach it to the soda maker, and gently press the carbonating lever. Listen for the distinct hissing sound of CO2 entering the bottle. If the lever operates smoothly and water carbonates effectively, your repair was successful! Check for any gas leaks during carbonation.
Conclusion
A broken carbonating lever doesn’t have to spell the end for your soda maker. With the right tools, a bit of patience, and these DIY repair techniques, you can often restore your machine to full functionality. Whether you opt for a clever wire reinforcement, a durable 3D printed replacement, or a simple adhesive fix, taking the DIY route is a rewarding way to extend the life of your appliance, save money, and contribute to less waste. Don’t let a small plastic part flatten your bubbly ambitions—empower yourself with these solutions!
What unexpected DIY repairs have you successfully tackled to keep your appliances running?
Frequently Asked Questions
Why is my SodaStream carbonating button stuck or not responding?
A stuck or unresponsive carbonating button is often due to a broken internal plastic pin or pivot point that prevents the lever from engaging the CO2 valve. This is a common wear-and-tear issue, and disassembly for repair, often involving wire reinforcement or a 3D-printed replacement, is usually required.
Can I get replacement parts for my SodaStream lever directly from the manufacturer?
Generally, manufacturers like SodaStream do not sell individual replacement parts for internal components like the carbonating lever. They often encourage customers to purchase a new machine, sometimes with a discount, which is why DIY repairs or sourcing third-party 3D-printed parts have become popular solutions.
What tools do I need to disassemble a SodaStream for repair?
Basic tools usually include Philips head and flathead screwdrivers. Depending on your model, you might also need a utility knife for cutting notches, pliers for manipulating wire, or a C-clip removal tool for specific handle designs. Always have a small container for screws.
Is it safe to repair my soda maker myself?
Yes, it can be safe to repair your Soda Maker yourself, provided you follow proper safety precautions. Always unplug the machine and remove the CO2 cylinder before starting any disassembly. Work in a well-lit area, handle components gently, and take photos to guide reassembly.
How long do DIY carbonating lever repairs typically last?
The longevity of a DIY repair depends on the method used and the quality of the materials. A well-executed wire reinforcement or a robust 3D-printed replacement part can often last longer than the original plastic component, as they are often designed to be more durable at the common stress points.