There’s nothing quite like the refreshing fizz of homemade sparkling water, but a sparkling beverage requires sparkling clean bottles. As an Admin for Sodamakerpro.com with over a decade of hands-on experience, I’ve seen firsthand how crucial proper cleaning is, not just for taste, but for health. Neglecting your soda maker bottles can lead to an unwelcome guest: mold. This comprehensive guide will walk you through everything you need to know, from understanding mold growth to implementing a rigorous cleaning and drying routine, ensuring your sparkling water stays pure and delicious.
|
Our Picks for the Best Soda maker in 2026
As an Amazon Associate I earn from qualifying purchases.
|
||
| Num | Product | Action |
|---|---|---|
| 1 | SodaStream - Terra Soda Streaming Machine - STARTER KIT - Sparkling Water Maker with CO2 & Bubly Drop - Eco-Friendly, No Batteries Needed - Black |

|
| 2 | SodaStream Terra Sparkling Water Maker Bundle in Black - includes 3-Pack CO2 and Carbonating Bottle |
|
| 3 | Mysoda Ruby 2 Sparkling Water Maker - Soda Streaming Machine Silent Carbonated Water Machine Robust Long-Lasting Aluminium Soda Maker 1L Water Bottle Without CO2 Cylinder - Black Copper Soda Machine |
|
| 4 | Ninja Thirsti Drink System, Soda Maker, Create Unique Sparkling and Still Drinks, Personalize Size and Flavor, Carbonated Water Machine, 60L CO2 Cylinder, Variety of Flavors, Color Black (model 1001) |
|
| 5 | SodaStream - Terra Sparkling Water Maker - VALUE BUNDLE - CQC CO2 system - Includes 2x CO2 Cylinders, 3x 32 Fl Oz Dishwasher Safe Bottles, 2x Bubly Flavor Drops - Combine with Pepsi Flavors - Black |
|
| 6 | Philips Soda Streaming Machine, Stainless Sparkling Water Maker Easy Install with Quick Twist 1L PET Carbonating Bottle, Soda Maker Compatible with 60L CO2 Carbonator (NOT Included), ADD4902BKOQ/37 |
|
| 7 | Black Stainless Steel Sparkling Water Maker Soda Machine Includes 1L Stainless Steel Black Bottle and 1 C02 Cylinder |
|
| 8 | Soda Siphon 1L,Portable Sparkling Water Maker,Compact Carbonated Water Machine for Flavored Drinks Reusable Beverages Machine Kit,Travel Soda Machine for Home & Outdoor |
|
| 9 | Philips Sparkling Water Maker, Soda Streaming Machine with Quick Twist Bottle, 1L BPA free PET Carbonating Bottle, Soda Maker Compatible with 60L CO2 Carbonator (NOT Included), ADD4902BKOQ/37 |
|
| 10 | Philips Sparkling Water Maker ADD4901BKOQ/37, Plastic Soda Streaming Machine with Quick Twist Bottle, 1L BPA free PET Carbonating Bottle, Soda Maker Compatible with 60L CO2 Carbonator (NOT Included) |
|
Understanding Mold Growth in Your Soda Maker Bottles
Mold thrives in dark, damp environments where organic matter is present. Your soda maker bottles, especially after holding flavored syrups or even just plain water, provide the perfect breeding ground for these microscopic fungi if not cleaned properly. Sugar residues clinging to the bottle’s interior or trapped moisture in hard-to-reach crevices create ideal conditions for mold spores to germinate and multiply.
The consequences of mold aren’t just unpleasant to look at; they can also pose health risks, ranging from allergic reactions and respiratory issues to potential infections. Beyond health concerns, mold and bacterial buildup can impart a musty odor and an off-putting taste to your beverages, diminishing the enjoyment of your homemade sodas. Regular, thorough cleaning is not merely a chore; it’s an essential practice to maintain hygiene, ensure peak flavor, and extend the lifespan of your bottles.
Essential Tools and Safe Cleaning Agents
To effectively combat mold and keep your soda maker bottles pristine, you don’t need an arsenal of harsh chemicals. Simple, readily available household items and a few specialized tools will do the trick.
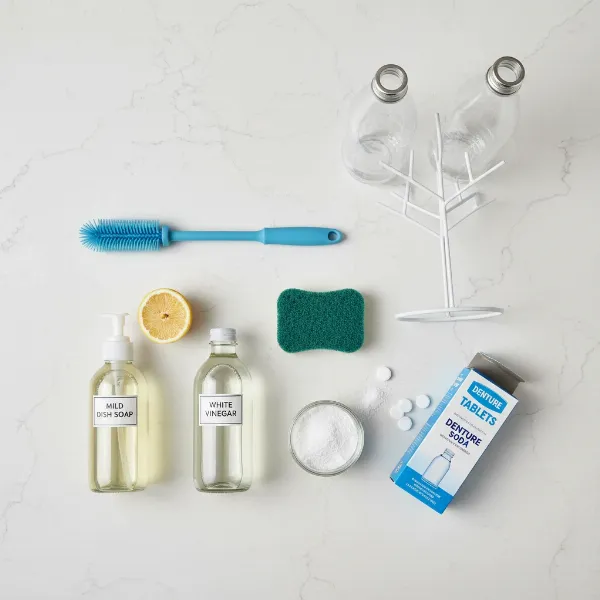 Assortment of safe cleaning tools and agents for soda maker bottles.
Recommended Cleaning Agents:
- Mild Dish Soap: Your everyday dish soap is excellent for breaking down sugar particles and washing away bacteria.
- White Vinegar: Known for its natural antibacterial properties and acidic quality, vinegar is highly effective at killing foodborne microbes and eliminating odors.
- Lemon Juice: Similar to vinegar, lemon juice’s acidity helps kill bacteria and can tackle stains and lingering smells, leaving a fresh scent.
- Baking Soda: Often used in conjunction with vinegar or lemon, baking soda acts as a mild abrasive and a powerful odor neutralizer.
- Denture Cleaning Tablets: For an effortless soak, denture tablets can be dropped into bottles with water to clean and deodorize, making them particularly useful for tough stains or odors.
Essential Cleaning Tools:
- Bottle Brush: A long-handled bottle brush is indispensable for reaching every corner of your bottle, especially the bottom and narrow neck. Opt for a silicone brush over those with rough polyester bristles, as silicone is less likely to cause micro-scratches that can harbor bacteria.
- Drying Rack: An efficient drying rack promotes optimal air circulation, which is critical for complete drying and mold prevention.
- Small Sponge/Cloth: Useful for cleaning caps and external surfaces.
What to Avoid:
- Hot Water (for most plastic bottles): The majority of plastic soda maker bottles (PET) are not designed for high temperatures. Exposing them to hot water (above 50°C / 120°F or 70°C / 158°F, depending on the bottle’s “dishwasher-safe” rating) can weaken the plastic’s integrity, deform the bottle, and create tiny cracks that become havens for bacteria. Always check your manufacturer’s guidelines.
- Abrasive Cleaners or Scouring Pads: These can scratch the plastic, providing more surfaces for mold and bacteria to cling to.
- Harsh Chemicals (e.g., undiluted bleach): While diluted bleach can sanitize, it’s generally best avoided for regular cleaning due to its corrosive nature and the risk of chemical burns if ingested. Stick to kitchen-safe products.
- Dishwashers (for non-dishwasher safe bottles): Unless explicitly stated as “dishwasher-safe” by the manufacturer, never put your soda maker bottles in the dishwasher. The high heat can cause irreparable damage.
Step-by-Step Guide to Deep Cleaning Your Soda Maker Bottles
A consistent cleaning routine is your best defense against mold. Here’s how to clean your bottles effectively, from a quick daily rinse to a thorough weekly deep clean.
For Everyday Rinsing
After each use, especially if you’ve only carbonated plain water, a simple rinse is often sufficient.
- Empty and Rinse: Immediately empty any leftover liquid from the bottle.
- Lukewarm Water: Fill the bottle approximately one-quarter full with lukewarm (not hot) water.
- Shake and Discard: Shake vigorously for about a minute, then discard the water. Repeat this 2-3 times to remove any loose residue.
For Weekly Deep Cleaning
For bottles used with flavored drinks, or for a general deep clean once a week (or every 2-3 days with frequent use), follow these steps:
- Disassemble: Remove the bottle cap and, if your bottle has one, carefully detach the removable base. Cleaning these separately ensures all areas are accessible.
- Soap and Water Scrub:
- Fill the bottle halfway with lukewarm water and add a small drop of mild dish soap.
- Insert your silicone bottle brush and gently scrub the entire interior surface, paying close attention to the bottom and sides. The brush will help dislodge any sticky residues or biofilm.
- For hard-to-reach areas, if you don’t have a bottle brush, you can add a small amount of uncooked rice, a dab of dish soap, and water, then shake vigorously. The rice acts as a gentle abrasive.
- Odor and Stain Removal Soak (Optional): If you notice lingering odors or stains, a quick soak can work wonders:
- Vinegar Soak: Fill the bottle with a mixture of equal parts white vinegar and lukewarm water. Let it sit for 15-20 minutes, or even overnight for stubborn issues.
- Lemon Juice Soak: Add the juice of one lemon (about 2-3 tablespoons) to warm water in the bottle, shake, and let sit for 15-20 minutes.
- Baking Soda & Vinegar: For tough smells or visible mold, add a tablespoon of baking soda to the bottle, then add a cup of vinegar. The fizzing action helps clean, then let it sit for a few minutes before rinsing.
- Denture Tablets: Drop one or two denture cleaning tablets into the bottle, fill with water, and let it soak according to the tablet instructions.
- Thorough Rinsing: This is a critical step. Rinse the bottle multiple times with lukewarm water until all soap, vinegar, or cleaning solution residue is completely gone and there are no lingering suds. Any leftover cleaner can affect the taste of your drinks.
- Clean Caps and Seals: Don’t forget the cap! Wash it thoroughly with dish soap and a sponge. Pay attention to any grooves or rubber seals where mold can hide. Ensure these are free from any buildup. If the cap has a removable seal, take it out and clean it separately.
The Golden Rule: Thorough Drying to Eliminate Mold
Even the most meticulous cleaning is futile if your bottles aren’t dried correctly. Moisture is mold’s best friend, so eliminating it completely is the ultimate mold prevention strategy.
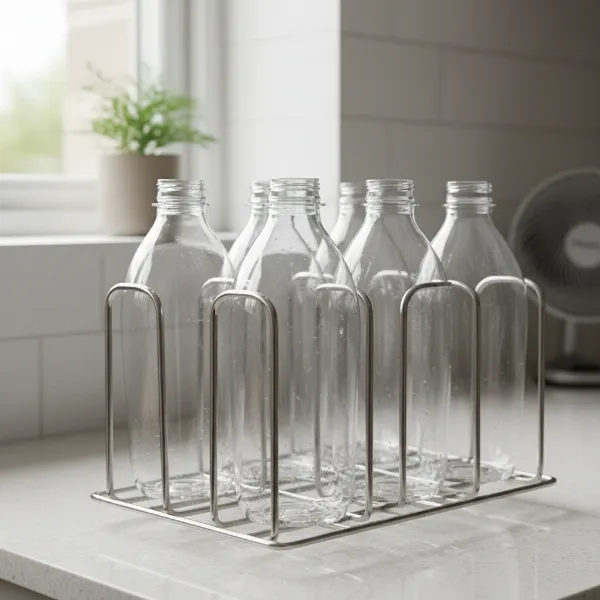 Soda maker bottles air drying upside down on a drying rack for optimal circulation.
- Air Dry Completely: Always allow your bottles to air dry fully before storing them. This can take several hours, sometimes up to 24-36 hours.
- Upside Down on a Rack: Place the bottle upside down on a drying rack. Ensure there’s sufficient airflow around the opening so that moisture doesn’t get trapped. Avoid letting the opening sit flat against a surface.
- Avoid Damp Places: Never dry your bottles in a damp environment, such as a closed cabinet or outdoors where bacteria and fungi thrive. A well-ventilated area indoors is ideal.
- Move Bottles Periodically: For bottles with removable bases, occasionally shift them or remove the base during drying to ensure no moisture is trapped underneath.
Advanced Tips for Mold-Free Soda Maker Bottles
Beyond the regular cleaning routine, a few extra habits can significantly reduce your chances of mold and extend your bottle’s life.
“A clean bottle is the foundation of a great sparkling drink. Neglecting it is like building a house on sand.” – Admin, Sodamakerpro.com
- Carbonate Plain Water Only: A top tip from experienced users is to carbonate only plain, cold water in your soda maker bottles. Add any flavors, syrups, or fruit infusions after carbonation, in a separate serving glass or container. This prevents sugary residues from sticking to the inside of your carbonating bottle, drastically reducing mold risk and making cleaning much easier.
- Regular Inspection: Periodically inspect your bottles for any signs of damage, such as scratches, cracks, or deformation. These imperfections can create hidden spots for bacteria and mold to grow. If a bottle is compromised, it’s best to replace it.
- Understand Bottle Lifespan: Most plastic soda maker bottles have an expiration date (often around 3 years) due to the stress of carbonation. This isn’t just a marketing ploy; the plastic can weaken over time, making it more susceptible to damage and bacterial ingress. Always adhere to the manufacturer’s recommended replacement schedule.
- Clean the Machine Too: While the focus is on bottles, remember to clean your soda maker machine itself. Wipe down the carbonation nozzle and drip tray regularly with a damp cloth and mild dish soap to prevent any cross-contamination.
Conclusion
Keeping your soda maker bottles clean and mold-free is essential for your health and the enjoyment of your sparkling beverages. By embracing a routine of daily rinsing, weekly deep cleaning with safe agents like dish soap, vinegar, and lemon, utilizing a bottle brush, and, most importantly, ensuring thorough air drying, you can effectively prevent mold. Remember the golden rule: moisture is the enemy of a clean bottle. Adopt these practices, and you’ll enjoy fresh, delicious, and hygienic sparkling drinks every time.
What cleaning tips have worked best for you in keeping your soda maker bottles pristine?
Frequently Asked Questions
Can I put my soda maker bottle in the dishwasher?
Most plastic soda maker bottles are not dishwasher safe due to the high heat, which can damage and deform the plastic, creating vulnerabilities for bacteria. Always check your bottle’s specific instructions; some newer models or glass bottles may be labeled as dishwasher-safe (typically up to 70°C).
How often should I clean my soda maker bottles?
Ideally, rinse your bottle with lukewarm water after every single use, especially if it only contained plain sparkling water. For a more thorough clean, or if you use flavored syrups, deep clean your bottles with soap and water at least once a week, or every 2-3 days.
What if my bottle already has mold?
If you discover mold, give your bottle a deep clean using a bottle brush, dish soap, and warm water. For stubborn mold and odors, soak the bottle in a solution of equal parts white vinegar and water, or a tablespoon of baking soda followed by vinegar, for several hours or overnight, then rinse thoroughly. Ensure complete drying afterward.
Can I use bleach to clean my soda maker bottle?
While a highly diluted bleach solution can sanitize, it’s generally not recommended for regular use on soda maker bottles due to its corrosive nature and the risk of accidental ingestion. Stick to milder, kitchen-safe alternatives like vinegar, lemon juice, or denture tablets for effective and safer cleaning.
Why can’t I use hot water on my plastic soda maker bottles?
Most plastic Soda Maker bottles are made from PET plastic, which can weaken, warp, or even leach chemicals when exposed to high temperatures (above 50-70°C or 120-158°F). This damage compromises the bottle’s integrity and can create microscopic scratches where bacteria and mold can thrive. Always use lukewarm or cold water for cleaning.