There’s nothing quite like the crisp, refreshing fizz of homemade sparkling water. But what happens when you’re ready to carbonate, and your CO2 canister simply refuses to screw into your soda maker? This common, yet frustrating, problem can bring your fizz-making dreams to a halt. As an experienced technician who has seen countless soda makers and their quirks, I understand the mechanics and the common pitfalls. Don’t let a stubborn canister ruin your day; this comprehensive guide will walk you through diagnosing the issue, providing practical troubleshooting steps, and ensuring your soda maker is bubbling happily again.
Understanding Your CO2 Canister and Soda Maker Connection
Before diving into troubleshooting, it’s essential to understand how your CO2 canister interacts with your soda maker. At its core, a soda maker uses a pressurized CO2 cylinder to infuse water with carbon dioxide, creating those delightful bubbles. The connection between the canister and the machine is crucial for both functionality and safety.
Most modern soda makers utilize one of two primary connection types:
- Screw-in Cylinders: These are typically blue and require you to twist the cylinder clockwise into the machine’s receptacle until it’s snug. The seal is created as the cylinder valve depresses against a pin inside the machine.
- Quick Connect Cylinders: Often distinguished by a pink color, these cylinders “snap” or “click” into place without needing to be screwed in. A lever or handle mechanism secures them, making installation generally quicker and simpler.
Regardless of the type, a proper, secure connection ensures that CO2 gas flows efficiently into your water and, critically, that there are no dangerous leaks of high-pressure gas.
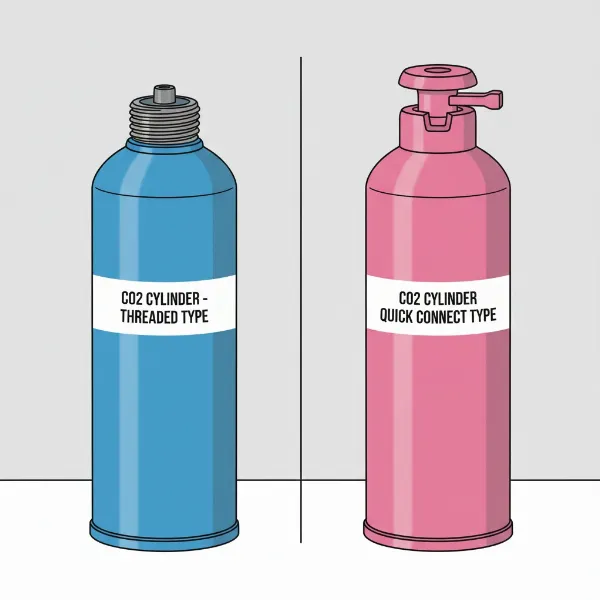 Illustration showing the difference between a blue screw-in CO2 cylinder and a pink quick-connect CO2 cylinder.
Common Reasons Your CO2 Canister Won’t Screw In
When your CO2 canister won’t screw in, it’s usually due to one of several identifiable problems. Understanding these common culprits is the first step toward a successful fix.
Incorrect Canister Type or Size
|
Our Picks for the Best Soda maker in 2026
As an Amazon Associate I earn from qualifying purchases.
|
||
| Num | Product | Action |
|---|---|---|
| 1 | SodaStream Terra Sparkling Water Maker Bundle in Black - includes 3-Pack CO2 and Carbonating Bottle |

|
| 2 | Black Stainless Steel Sparkling Water Maker Soda Machine Includes 1L Stainless Steel Black Bottle and 1 C02 Cylinder |
|
| 3 | Philips Soda Streaming Machine, Stainless Sparkling Water Maker Easy Install with Quick Twist 1L PET Carbonating Bottle, Soda Maker Compatible with 60L CO2 Carbonator (NOT Included), ADD4902BKOQ/37 |
|
| 4 | SodaStream - Terra Sparkling Water Maker - VALUE BUNDLE - CQC CO2 system - Includes 2x CO2 Cylinders, 3x 32 Fl Oz Dishwasher Safe Bottles, 2x Bubly Flavor Drops - Combine with Pepsi Flavors - Black |
|
| 5 | Ninja Thirsti Drink System, Soda Maker, Create Unique Sparkling and Still Drinks, Personalize Size and Flavor, Carbonated Water Machine, 60L CO2 Cylinder, Variety of Flavors, Color Black (model 1001) |
|
| 6 | Philips Sparkling Water Maker ADD4901BKOQ/37, Plastic Soda Streaming Machine with Quick Twist Bottle, 1L BPA free PET Carbonating Bottle, Soda Maker Compatible with 60L CO2 Carbonator (NOT Included) |
|
| 7 | Mysoda Ruby 2 Sparkling Water Maker - Soda Streaming Machine Silent Carbonated Water Machine Robust Long-Lasting Aluminium Soda Maker 1L Water Bottle Without CO2 Cylinder - Black Copper Soda Machine |
|
| 8 | SodaStream - Terra Soda Streaming Machine - STARTER KIT - Sparkling Water Maker with CO2 & Bubly Drop - Eco-Friendly, No Batteries Needed - Black |
|
| 9 | Soda Siphon 1L,Portable Sparkling Water Maker,Compact Carbonated Water Machine for Flavored Drinks Reusable Beverages Machine Kit,Travel Soda Machine for Home & Outdoor |
|
| 10 | Philips Sparkling Water Maker, Soda Streaming Machine with Quick Twist Bottle, 1L BPA free PET Carbonating Bottle, Soda Maker Compatible with 60L CO2 Carbonator (NOT Included), ADD4902BKOQ/37 |
|
This is perhaps the most frequent reason for a fitting issue. Modern soda makers are often designed for specific cylinder types (screw-in or quick connect). Attempting to insert a quick connect cylinder into a machine designed for screw-in, or vice-versa, simply won’t work. Always double-check your soda maker’s manual or the label on your machine to confirm which type of cylinder it requires. Some brands, like SodaStream, have transitioned models, leading to potential confusion.
Misalignment and Cross-threading
When dealing with screw-in canisters, misalignment is a prime suspect. If the threads on the canister aren’t perfectly aligned with the threads in the soda maker’s receptacle, trying to force it will lead to “cross-threading.” This damages the threads on either the canister, the machine, or both, making a secure connection impossible and potentially causing permanent damage. It’s like trying to put a screw into wood at an angle – it won’t go straight, and it will strip the wood.
Obstructions or Debris in the Valve/Socket
Even a tiny piece of debris can prevent a proper connection. This could be anything from a stray plastic shard from packaging, dust, a piece of a broken seal, or even dried residue from previous carbonation. Such obstructions can block the canister from seating fully or interfere with the threading, making it impossible to screw in correctly.
Damaged Threads on Canister or Machine
Over time, or due to improper installation (like cross-threading), the metal threads on either the CO2 canister or within the soda maker itself can become worn, bent, or damaged. If the threads are visibly stripped or malformed, the canister will not catch or screw in smoothly. This is a more serious issue as damaged machine threads may require professional repair or replacement.
Over-tightening from Previous Use
While you need a snug fit, over-tightening a screw-in canister can make it incredibly difficult to remove, and subsequently, to insert a new one properly. Residual tension or slightly deformed components from excessive force during removal can sometimes impede the next canister’s installation.
Canister Valve Issues
Though less common, a manufacturing defect or damage to the CO2 canister’s valve itself can prevent proper seating. The pin that activates the CO2 release might be stuck or misaligned, which can interfere with the connection, even if the threads are perfect.
Step-by-Step Troubleshooting Guide: When Your CO2 Canister Gets Stuck
Facing a CO2 canister that won’t screw in can be frustrating, but many issues can be resolved with careful troubleshooting. Remember, safety is paramount when dealing with pressurized gas.
Safety First: Before You Begin
- Unplug the machine: If your soda maker is electric, always unplug it before inspecting or attempting to fix anything.
- No forcing: Never use excessive force or tools to screw in or remove a canister. This can damage the threads, the machine, or even lead to dangerous gas leaks.
- Work in a well-ventilated area: If there’s a suspected leak, ensure good airflow.
- Protect your eyes: Wearing safety glasses is a good precaution when working with pressurized systems.
Visually Inspect the Canister and Soda Maker
Start by a thorough visual inspection.
- Check the Canister: Look at the top of the canister. Are there any caps or seals that need to be removed? (New canisters often have a plastic seal or cap that must be taken off). Inspect the threads (for screw-in types) for any visible damage, nicks, or debris. For quick-connect canisters, check the connection point for any foreign objects.
- Check the Soda Maker’s Receptacle: Shine a flashlight into the area where the canister connects. Look for debris, bent pins, or damaged threads. Use a cotton swab or a soft cloth to gently clean out any dust or residue.
Check for Misalignment and Reattempt
For screw-in canisters, misalignment is a common cause.
- Remove and Re-seat: Completely remove the canister.
- Align Carefully: Gently place the canister into the soda maker’s receptacle. Do not tilt it. Ensure it’s perfectly straight before you start turning.
- Slow and Gentle Turn: With light downward pressure, slowly turn the canister counter-clockwise a quarter turn until you feel the threads “click” into alignment. Then, gently turn clockwise to screw it in. It should turn smoothly without resistance. If you feel any resistance, stop immediately, unscrew, and re-align.
“A common mistake I see is people rushing the installation. Patience is key. If it doesn’t feel right, it probably isn’t.” – David Chen, Lead Technician at Sodamakerpro.com
Clean the Connection Area
Debris can be invisible until it causes a problem.
- For Screw-in: Use a small, soft brush (like a clean toothbrush) or a cotton swab to gently clean the threads on both the canister and the machine. You can also use a can of compressed air to blow out any hidden particles.
- For Quick Connect: Use a clean, damp cloth to wipe around the connection port on your machine and the top of the canister to remove any sticky residue or dirt.
Inspect Threads for Damage
If the canister still won’t screw in smoothly after alignment and cleaning, examine the threads closely.
- Canister Threads: If the canister’s threads are visibly stripped or damaged, the canister is compromised and should not be used. It needs to be exchanged for a new one.
- Machine Threads: If the threads within your soda maker are damaged, this is more serious. You might try to carefully, gently, clean them with a small, stiff brush, but avoid further damaging them. If the damage is significant, contact the manufacturer’s support.
Try a Different Canister (If Available)
If you have another CO2 canister (especially a brand new one), try installing it. If the new canister screws in perfectly, it indicates the issue was with the previous canister (e.g., damaged threads, faulty valve). If the new canister also struggles, the problem is likely with your soda maker.
Address Over-tightening Issues
If a canister is stuck from over-tightening:
- Gentle Force: Try to loosen it by hand with a firm but steady counter-clockwise turn.
- Manufacturer Specifics: Some SodaStream models (like the Terra) have a small Philips head screw located underneath the connection point. Loosening this screw can slightly lower the platform, releasing tension on a stuck canister, allowing you to unscrew it. Consult your specific model’s manual for such features. Always re-tighten this screw after the canister is removed and before installing a new one.
What if the Canister is Stuck and Won’t Come Out?
If a canister is firmly stuck and won’t budge even after trying the above steps:
- Release Residual Gas: If possible and safe to do so, gently press the carbonation button to release any remaining gas pressure within the system. This can sometimes ease the canister’s grip.
- Avoid Force: Do not use pliers or other tools to force it. This can lead to a dangerous rupture or further damage.
- Contact Support: If the canister remains stuck, it’s safest to contact the soda maker manufacturer’s customer support. They can provide model-specific advice or arrange for safe removal.
How to Properly Install a CO2 Canister (and Avoid Future Problems)
Preventing issues is always better than fixing them. Following proper installation techniques will ensure a smooth, problem-free experience.
Preparing for Installation
- Right Canister: Always ensure you’re using the correct type of CO2 cylinder (screw-in or quick connect) for your specific soda maker model.
- Read the Manual: Even if you’ve done it before, a quick review of your machine’s user manual for canister installation can refresh your memory on model-specific nuances.
- Remove Packaging: Take off any plastic wraps, seals, or caps from the new CO2 canister.
The Right Way to Screw In Your Canister
- Placement: For screw-in cylinders, gently place the canister into the machine’s cylinder holder or compartment.
- Alignment is Key: Ensure the canister is perfectly upright and centered with the receiving valve/threads in the machine.
- Start Slowly, Clockwise: Rotate the canister counter-clockwise a quarter turn until you feel the threads engage, then slowly turn it clockwise. It should thread smoothly without any resistance.
- Hand-Tighten Only: Continue screwing until the canister is snug. Do not overtighten. The moment you feel firm resistance, stop. Using tools or excessive force is unnecessary and can damage threads.
Tips for Quick Connect Canister Installation
- Lift Lever/Handle: For quick connect systems, raise the connection lever or handle as per your machine’s instructions.
- Insert Bottom First: Position the bottom of the cylinder into the soda maker’s base, then gently guide the rest of the cylinder into the holder.
- Lower Lever: Push the connection lever or handle down firmly until it clicks into place. This secures the cylinder.
Tips for a Secure, Leak-Free Connection
- Listen for the Seal: With screw-in cylinders, you might hear a slight hiss as the seal engages, which is normal. For quick-connect, the firm click indicates it’s seated.
- Test for Leaks: After installation, if you notice a continuous hissing sound or smell gas, immediately remove the canister (if safe to do so) and re-evaluate the connection.
- Regular Cleaning: Periodically clean the canister connection area in your soda maker to prevent debris buildup.
 Step-by-step visual guide demonstrating correct installation of a CO2 canister into a soda maker.
When to Call for Professional Help or Consider Replacement
While many CO2 canister issues are DIY-fixable, there are times when professional intervention or even a replacement is the best course of action.
If, after trying all troubleshooting steps, your CO2 canister still won’t screw in, or if it’s stuck and you can’t safely remove it, it’s time to reach out. Contact the manufacturer’s customer support. They can offer specific guidance for your model, arrange for repairs, or advise on warranty claims. Attempting to force a solution or disassemble the machine beyond basic cleaning can void your warranty and potentially create a safety hazard.
Consider replacement if:
- The threads on your soda maker are visibly stripped or damaged beyond repair.
- The locking mechanism for a quick-connect system is broken or faulty.
- The machine consistently leaks gas despite proper canister installation.
- The cost of repair approaches the cost of a new machine, especially if your model is older.
Remember, a well-maintained soda maker is a happy soda maker, and a properly connected CO2 canister is the foundation of every perfect bubble.
Conclusion
A CO2 canister that won’t screw into your soda maker can be a vexing problem, but with a systematic approach, it’s often easily resolved. From ensuring you have the correct canister type to carefully aligning threads and keeping the connection area clean, most issues stem from simple oversights or minor obstructions. Always prioritize safety, avoiding excessive force and consulting your user manual for model-specific instructions. By understanding the mechanics and following these troubleshooting steps, you’ll be enjoying perfectly carbonated beverages again in no time, extending the life and enjoyment of your soda maker. What sparkling concoction will you create first once your machine is back in action?
Frequently Asked Questions
What are the main differences between Screw-in and Quick Connect CO2 canisters?
Screw-in canisters, often blue, twist into the soda maker, relying on thread alignment. Quick Connect canisters, typically pink, click or snap into place with a lever mechanism, offering a faster and often simpler installation without threading.
My new CO2 canister came with a cap. Should I remove it before installation?
Yes, absolutely. New CO2 canisters often have a plastic seal or cap on the valve to protect it during shipping. This must be removed before you attempt to install the canister into your soda maker.
Can I use a different brand of CO2 canister in my soda maker?
Compatibility varies greatly. Most soda maker manufacturers recommend or require using their own brand of CO2 cylinders to ensure a proper fit, safety, and optimal performance. Using off-brand canisters can sometimes lead to fitting issues or even damage your machine.
What should I do if I accidentally cross-threaded my CO2 canister into the soda maker?
If you suspect cross-threading, stop immediately. Gently unscrew the canister, inspect both the canister and the machine’s threads for damage, and then carefully re-align and re-attempt installation. If threads are visibly damaged, the canister should be replaced, and the machine inspected for potential repair.
Is it normal for my soda maker to make a hissing sound when I install the CO2 canister?
A very brief, faint hiss as the CO2 canister’s seal engages during installation (especially with screw-in types) can be normal. However, a continuous, loud hiss indicates a leak, meaning the canister is not properly sealed. In such cases, remove and re-install the canister carefully.
My CO2 canister is stuck, and I can’t get it out. What’s the safest way to remove it?
First, ensure any remaining gas pressure is released by gently pressing the carbonation button. Never use tools or excessive force. Some models have a release screw (check your manual). If it remains stuck, contact the manufacturer’s customer support for safe removal instructions.